Lakeside Retreat: A Paper Pumpkin Thing Blog Hop
- Vy Tran
- 7 hours ago
- 4 min read

Hi! I’m Vy with Crafting Daily Dose. Welcome to this month’s A Paper Pumpkin Thing Blog Hop, featuring alternatives for the April 2026 Lakeside Retreat kit.
This kit included supplies for 9 cards, 3 each of 3 designs. Kits always come with an exclusive stamp set, a mini ink cube, embellishments, and adhesives. As of today, refills are still available.
This is a gorgeous kit, and because it coordinates with the Waterside Retreat suite, that opens up even more possibilities for each.
My first project is a pop-up card that opens up to show the inside of a cozy beachside cabin.
I used the cardbase that has a woodgrain design and trimmed off 1/2" from the left side (indicated below by hash marks) and scored it at 1/2" from the right side (indicated by dashed line). Next, I used my trimmer to cut a rectangle. I turned the cardbase so that the short side with the score line was at the top of the trimmer. At 1-1/2" from the left edge, I cut from the 1-1/2" mark to the 4" mark, and I repeated this at 4" from the left edge (indicated by solid lines). Finally, I turned the cardbase back to landscape orientation and connected those 2 cuts to form a rectangular window. Alternatively, you can cut the opening with a craft knife or with a similarly-sized die.


Next, I prepared a Pool Party cardbase that has the usual score line at 4-1/2" and an additional score line at 8" from the left edge (see measurements below). I centered the panel with the lovely beach scene between those 2 score lines. I adhered the 2 cardbases together, lining up the left edges. Next, I flipped over the panel with the window in it and folded back the 1/2" tab. After applying glue to the tab, I folded the back of the Pool Party cardbase onto the exposed adhesive. Now when the card is opened, the inside looks like a cabin with a window looking out onto the beach.


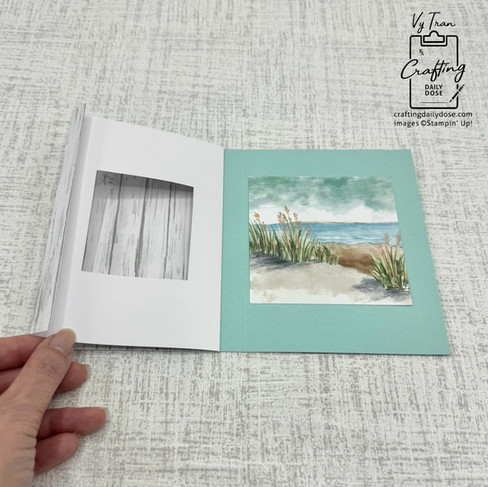


Then it was time to decorate! To help the fish plaque stand out more, I colored the edge of it with a Pecan Pie Blends marker. The "curtain" is from a decorative strip from the kit. For the message panel, I stamped a sentiment onto Willow White cardstock using Gray Granite ink. I layered a piece of Gray Granite cardstock underneath it, in part because the added weight helps to keep a pop-up card like this closed.


On the front of the card, I used coordinating Waterside Retreat Designer Series Paper for the background. I turned the large round die cut over to the white side and used blending brushes and ink to create my own beach scene. To keep the line between the horizon and sky crisp, I masked off the section I wasn't working on. The colors used for the scene were Crumb Cake, Pecan Pie, Azure Afternoon, and Pool Party, and I stamped the sentiment and images with Gray Granite ink. Finally, I added a few pebble embellishments.

Measurements:
- Kit cardbase
8-1/2" (W) x 5-1/2" (H), scored at 4-1/4" (original score line) and 8" along the long side
trim off 1/2" from the left edge
turn cardbase so that the short side with the scoreline is at the top; at 1-1/2" and at 4" from the left edge, cut from 1-1/2" to 4", and then turn the cardbase back to landscape orientation to cut, connecting the previous cuts to complete a rectangle
- Pool Party cardstock
8-1/2" (W) x 5-1/2" (H), scored at 4-1/4" and 8" along the long side
- Gray Granite cardstock
3" (W) x 4-3/4" (H)
- White Willow cardstock
- Waterside Retreat DSP
4" (W) x 5-1/4" (H)
- Kit decorative strip
3” (W) x 3/4” (H), scored at 1/4” along the short side
I love that beach scene so much that I wanted to feature it in a different way. This time, I made a bridge fold card.
I started with a Pool Party cardbase, and after making all the score lines (see measurements below), I added the beach scene to the center panel, aligning it with the top edge. Next, I roughly blended in Crumb Cake ink onto a strip of Crumb Cake cardstock and then tore the top edge. This was adhered to the bottom edge of the cardbase to add interest and to cover up the gap since the beach image is not tall enough for our card. I checked at this point to make sure my card could fold flat. If you have trouble getting yours flat, you may want to cut the strip of "sand" at the score lines and adhere each section on separately. I then stamped on the birds using Gray Granite ink.


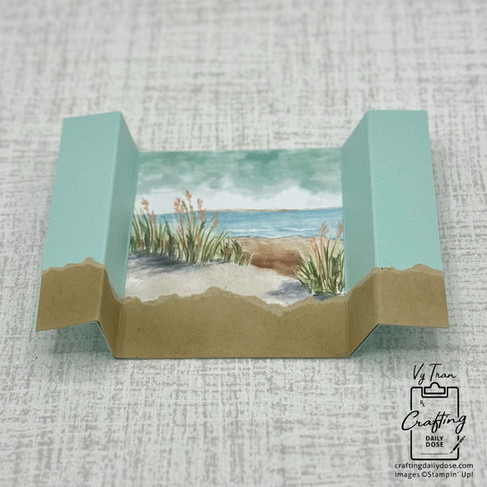
The bridge piece is another strip of Crumb Cake cardstock that I blended with ink and then tore. I then added a sentiment and embellishments.

For the message panel on the back, I lightly blended in some Crumb Cake “sand” at the bottom edge, and I stamped the images using Gray Granite ink.

Measurements:
- Pool Party cardstock
7-1/2" (W) x 4-1/4" (H), scored at 1", 2", 5-1/2", and 6-1/2” along the long side
- Crumb Cake cardstock
7-1/2" (W) x 2" (H), scored at 1", 2", 5-1/2", and 6-1/2” along the long side; tear along top edge
5-1/2" (W) x 1-3/4" (H); tear along top edge
- White Willow cardstock
3-1/4" (W) x 4" (H)
Thank you so much for visiting! Don’t forget to follow the hop to see other creative projects from our team!
Subscribe to Paper Pumpkin by May 10th to receive the next kit, Sparkling Celebrations. The Wonderful Scenes add-on dies includes a fireworks image that coordinates with this kit!.

Shoppable Supply List: