Sweet Sunflowers: A Paper Pumpkin Thing Blog Hop
- Vy Tran

- Sep 2, 2022
- 3 min read

Hi! I’m Vy with Crafting Daily Dose. Welcome to this month’s A Paper Pumpkin Thing Blog Hop, featuring alternatives for the August 2022 Sweet Sunflowers kit.
This beautiful kit included supplies for 9 cards—3 each of 3 different designs—along with matching envelopes. Kits always come with an exclusive stamp set, a mini ink cube, embellishments, and adhesives. In August, we got a bonus 2nd ink pad and some honeycomb gold foil sheets too!

This kit was so popular that there weren’t enough supplies left to make refills available—but fingers crossed that it might come back in another form!

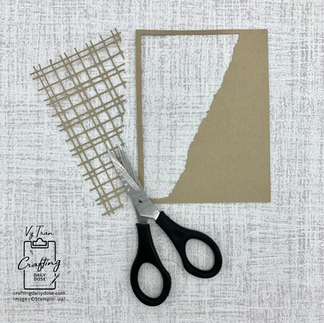
For this first card, I started with a Crumb Cake cardbase, splattered Soft Suede and Whisper White inks on it, and then blended on some Crushed Curry ink. Next, the front panel was created with the Split Card Texture dies, but I cut away the grid design (don’t worry, I’ll hang on to it for something else).


I flipped the sunflower stamp upside down and inked up the back of it (the smooth side) with Crushed Curry. After stamping off onto scrap paper, I stamped with the residual ink to add a quick splash of color. Next, I stamped the flower and sentiment using Soft Suede ink. I then glued the honeycomb gold foil around the edges of the panel and cut away parts of it on the back that wouldn’t be seen. This front panel was added to the cardbase using Foam Adhesive Strips and Foam Adhesive Sheets. To complete the front, I glued on some bees.

The inside of the card has a sentiment stamped onto a simple strip of Crumb Cake cardstock. I also added the bits of honeycomb gold foil I had cut out earlier.

Measurements:
-Crumb Cake Cardstock
8-1/2” (W) x 5-1/2” (H), scored at 4-1/4” along the long side
4” (W) x 5-1/4” (H)
4-1/4” (W) x 3/4” (H)
-Basic White cardstock
4” (W) x 5-1/4” (H)

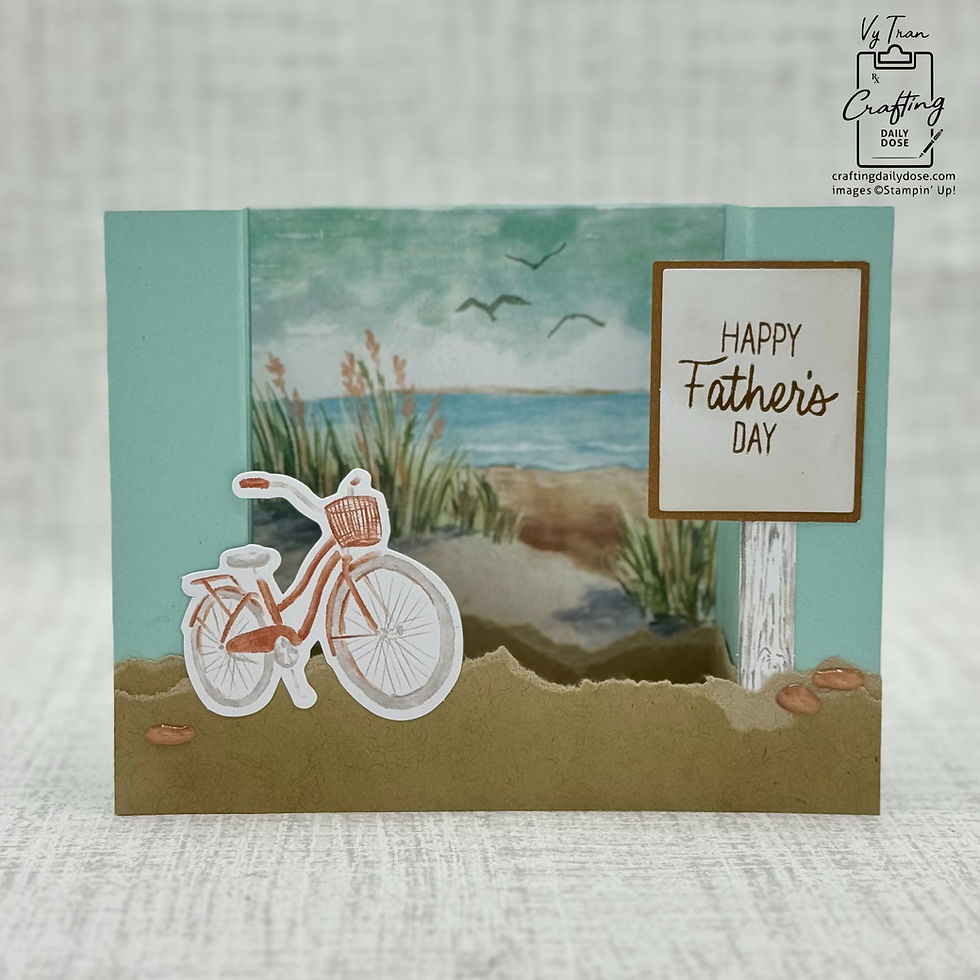
My second card is a shadowbox that folds flat to fit in a standard envelope. The openings were cut with the 4th, 5th, and 6th largest Layering Diorama dies. I used a honeycomb gold foil sheet to dry emboss the background, using the same sandwich of plates as for die cutting: 1 + 2 + 3 + cardstock + honeycomb gold foil + 3. I lightly blended on some Crushed Curry ink and then used Wink of Stella to highlight some of the hexagon shapes.


The next layer up has the same Soft Suede and Whisper White ink splatters that I did for the first card, along with Crushed Curry ink blended on. The final layer has the honeycomb gold foil, and to keep things looking tidy, I covered the back of that layer too.
The box is constructed by folding all the score lines on the largest Crumb Cake piece as mountain folds and then adhering the first and last panels together. The seam forms the bottom of the box. Fold the score lines on the insert layers as valley folds and glue them into the box.


For the front, I stamped a sunflower and blended ink onto it before fussy cutting it out. I also stamped and fussy cut a leaf, and then used a flower die cut from the kit. I stamped a sentiment label from the kit for the top of the card and added some leftover gold foil. Finally, the back has some Melon Mambo and Crushed Curry ink blended onto the message panel, to match the sentiment label.

Measurements:
-Crumb Cake Cardstock
4-1/4” (W) x 11” (H), scored at 1/2”, 4-1/2”, 5-3/4”, and 9-3/4” along the long side
TWO 4-1/4” (W) x 4-3/4” (H), scored at 3/8” and 4-3/8” along the long side (3/8” from each side)
4-1/4” (W) x 4” (H) (to cover back of honeycomb layer)
Basic White cardstock
4” (W) x 3-3/4” (H)
Thank you so much for visiting! Don’t forget to follow the hop to see other creative ideas from our team!
September 10th is the last day to sign up for next month’s kit, called Spooky Treats. This kit will make 18 treat boxes, 2-1/2" x 3" x 1", 6 each of 3 designs. We'll get an Orchid Oasis mini ink cube, which is one of the new In Colors! If you‘re in the U.S. and would like to subscribe to Paper Pumpkin with me, I’ll send you a handmade thank you card, and I’ll be sure to let you know when I post new ideas!

Shoppable Supply List:


Comments