From the North Pole: A Paper Pumpkin Thing Blog Hop
- Vy Tran

- Dec 2, 2022
- 3 min read
Updated: Dec 4, 2022

Hi! I’m Vy with Crafting Daily Dose. Welcome to this month’s A Paper Pumpkin Thing Blog Hop, featuring alternatives for the November 2022 From the North Pole kit.
This festive kit included supplies for 12 gift tags—4 each of 3 different designs. Kits always come with an exclusive stamp set, a mini ink cube, embellishments, and adhesives.

As of today, refills are available to subscribers.
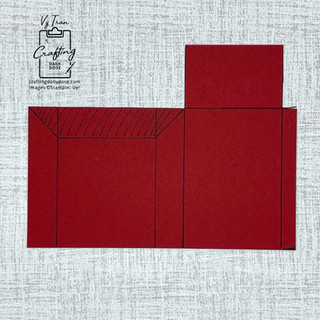
This first project is designed to pop up and look like a fun mailbox, with an insert to hold a gift card. It uses my favorite stamp from the kit, along with the ink and some die cuts. I did add cardstock and an envelope. Here's a tutorial if you'd like to make one:
Measurements*:
-Cherry Cobbler Cardstock
9" (W) x 7-1/4" (H), scored at 1", 4-1/4", 5-1/4", and 8-1/2" along the long side; and at 2-1/4" along the short side
4-1/4" (W) x 6" (H), scored at 1/2" and 3-3/4" along the short side; and at 3-1/2" along the long side
-Shaded Spruce Cardstock
2-3/4" (W) x 4-1/2" (H)
-Basic White Cardstock
2-1/2" (W) x 4-1/4" (H)
Refer to the video and the pictures below for guidance on cutting the Cherry Cobbler pieces after they've been scored.


Note that the insert was designed to hold a gift card. If you'd like to instead put in a tag or a message that is taller than a gift card, you can either resize the insert or just install it further down in the card.


To pull everything together, I used the reindeer stamp on an envelope. Having a cushiony surface underneath and pressing down firmly helps to ensure a good image, even on the uneven surface of the envelope flap.


In keeping with the mail theme, the second card is decorated like an envelope and opens to reveals a "letter" on vellum. There's room for a gift card and a message inside. As always, you can find the supply list at the end of the post.


Measurements:
-Basic White Thick cardstock
5-1/2” (W) x 11” (H), scored at 4-1/8” and 8-3/8" along the long side
-Vellum Layering Designs
5-1/4” (W) x 3-7/8” (H) for bottom panel
5-1/4” (W) x 4” (H) for middle panel
-Basic White cardstock
5” (W) x 3-3/4” (H)
After scoring the cardbase, I used one of the Basic Borders dies to create the envelope flap on the shortest panel. The "stamp" was punched out from one of the tags in the kit using the Rectangular Postage Stamp punch. The images are from a combination of both October and November kits, stamped in Cherry Cobbler, Shaded Spruce, and Memento Tuxedo Black. For reference, I've shown how the card looks on the outside when it's completely opened.


I glued a Santa Hat onto the "Ho Ho Ho" banner from the kit and then attached it to the middle vellum layer (the slightly larger one) using glue dots, but only under the top of the hat and the 2 tails of the banner. That way, there's plenty of room to slide in a gift card. I used Stampin' Seal to attach the Basic White message panel to the smaller vellum layer. I was then able to attach the vellum layers to the cardbase by hiding more Stampin' Seal adhesive underneath the parts that were covered up. I did also add a mini glue dot underneath each corner of the middle panel.
If you'd like, you can tie the card closed with twine from the kit.
Thank you so much for visiting! Don’t forget to follow the hop to see other creative ideas from our team!
December 10th is the last day to sign up for next month’s kit, called Good Things Come in Small Packages. This kit makes 16 gift card holders, 2 each of 8 reversible designs. We'll get a Garden Green mini ink cube! There's an add-on available to help make matching cards. If you‘re in the U.S. and would like to subscribe to Paper Pumpkin with me, I’ll send you a handmade thank you card, and I’ll be sure to let you know when I post new ideas!

*Note: scoring measurements corrected on 12/4 for mailbox insert. If you had printed them off before, please note the correction
Shoppable Supply List:


Comments